Please Consider Deleting Unused Data or Apps and Try Again Gthtdjl
Z7_3054ICK0KGTE30AQO5O3KA30N0
hp-concentra-wrapper-portlet
![]() Actions
Actions
HP DeskJet GT 5810, 5820 Printers - Color or Black Ink Non Press; Other Print Quality Issues
This document is for HP DeskJet GT 5810 5811, 5820, 5821, and 5822 All-in-One printers.
The printer is working, but the printed output is missing black or color ink, or the printed page is blank or has very niggling ink.
Step one: Utilise 18-carat HP printheads and ink
HP recommends that yous use 18-carat HP ink. HP cannot guarantee the quality or reliability of non-HP ink. If you do not utilize 18-carat HP ink and HP printheads, the steps in this document might non resolve impress quality bug.
Purchase replacement ink and other supplies from the HP Store or local retailers.
note:Using non-HP ink contaminates whatever 18-carat HP ink added later. Because ink remains in the printhead when the ink is changed, the contaminated ink tin remain in the organization and affect impress quality.
If you are using genuine HP printheads and ink, keep to the adjacent step.
Step 2: Refill any low or empty ink tanks
Low ink levels can bear upon print quality.
caution:Damage to the printer equally a effect of improperly filling the ink tanks or using non-HP ink is not covered under warranty.
Do not let the ink levels fall beneath the minimum make full line when printing. Very depression ink levels tin effect in reduced impress quality or damage to the ink system.
-
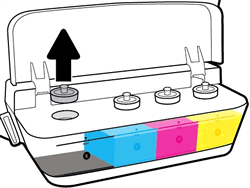
Visually check the printer ink levels using the ink tank window.
-
Maximum fill up line
-
Minimum fill up line

-
If any ink level is below or close to the minimum fill up line, continue with these steps to refill whatever low ink tanks.
-
-
Open the ink tank hat.

-
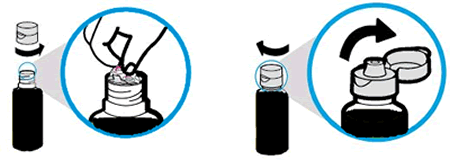
Remove the plug from the ink tank you are refilling. Ready the plug upside-down on a disposable piece of paper.
caution:
Avoid ink stains. Ink might be on the underside of the plug.
-
Remove the cap from the ink canteen, pull off the seal tab, supercede the cap, and then flip open the lid.
-
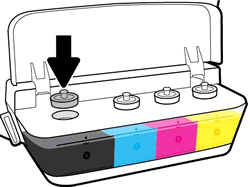
Hold the ink bottle on the tank spout, gently push down, and then let the ink bleed into the ink tank. Fill the ink tank to merely below the maximum fill line on the tank.
If the bottle does not showtime draining, remove and reinsert the bottle onto the tank spout.
circumspection:
Practice not clasp the bottle, and do not overfill the ink tank.

-
Later the ink tank is filled, pull the ink bottle straight upwardly.
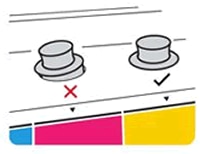
Close the ink bottle lid, fix the bottle upright, and then push the ink tank plug into its slot on the ink tank.
-
Make sure the ink tank plugs are pressed firmly into place.
-
Repeat the previous steps to fill any other low or empty ink tanks.
circumspection:
Store any bottle with remaining ink in a cool, dry place for subsequently use.
-
Shut the ink tank hat.

Step 3: Cheque for ink smears on the back of printouts
If there are smears of ink on the back of your printouts, use an automated tool to resolve the issue.
-
Load paper into the input tray.
-
Printing and hold the Power button, press the Cancel push
 3 times, printing the Start Copy Color button
  8 times, and and so release the Power button.
The printer feeds one page slowly. The printer might make some noise for approximately 1 infinitesimal.
-
Look until the folio ejects from the printer before you remove it.
-
Examine the test page.
If the print quality is unacceptable, continue to the next stride.
Pace 4: Check the ink delivery organisation
Make sure the transportation ink valve is unlocked, the printhead latch is closed, and ink completely fills the ink delivery tubes.
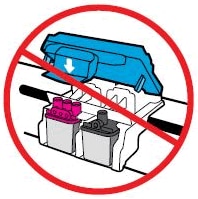
caution:While performing the following steps, do not touch the blue printhead latch! Touching the latch might open the carriage and crusade damage to the ink system.
-
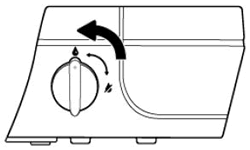
Brand certain the transportation ink valve is in the unlocked position.
caution:
Press with a locked transportation ink valve tin can impairment the printheads.
-
Make sure the printer is turned on.
-
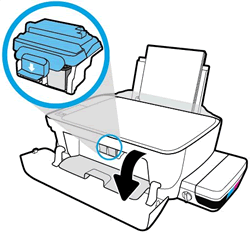
Inspect the position of the blue printhead latch.
-
Open the exterior door.
-
Open up the printhead access door.
-
Expect until the carriage is idle and silent before you continue.
-
Visually audit the printhead latch position.
-
If the printhead latch is closed, continue to the next step.
caution:
Exercise not touch the blue printhead latch! Touching the latch might open the carriage and cause impairment to the ink system.
-
-
-
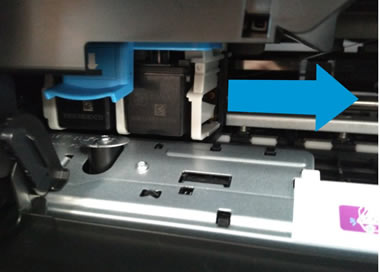
Reach within the printer through the printhead access door, and then manually move the carriage to the right.
-
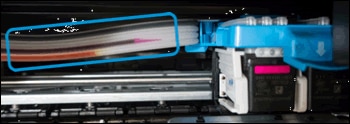
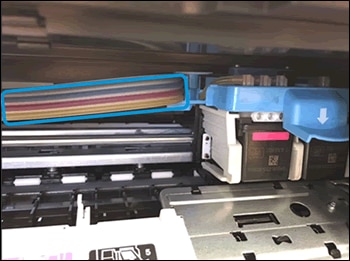
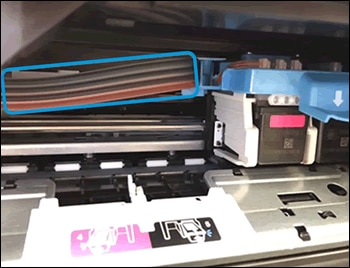
Visually inspect the ink delivery tubes.
-
If the tubes are white or ink stained, the printer is not properly primed or out of ink, skip to Replace the printheads.
-
If the tubes are completely filled with dark ink, the printer is properly primed and filled with ink, go on to the next step.
-
Step 5: Make sure you lot are using the appropriate newspaper for your impress job
Use the following guidelines to make sure the paper you are using is advisable for the impress job. If it is not, reload the printer with an appropriate newspaper type.
-
Load the paper print side down in the input tray. Many papers have printing and nonprinting sides, such as photo paper and envelopes. Usually, the smoother side is the "print side," and sometimes the non-print side has a logo of the paper manufacturer on it.
-
Do not use wrinkled or curled paper. Use only clean, contraction-gratuitous newspaper.
-
Employ the right paper type for your project.
-
For everyday text documents, evidently newspaper with ColorLok technology works well. Paper with ColorLok technology is industry-standard newspaper that works well with HP ink.
-
For documents with dense printing, such as high contrast graphics or photos, use HP Advanced Photo Paper for best results.
-
Some paper might not absorb ink as well every bit others. If your prints smear hands, make sure y'all are using a recommended paper.
-
-
Shop photograph paper in its original packaging inside a resealable plastic bag. Shop the paper on a flat surface in a cool, dry place. Load 10-20 sheets of photograph newspaper only when you lot are fix to print, and then put the unused paper back in the packaging.
-
Try using a different paper. This determines if the problem is related to the paper.
After checking the paper, try to print once again. If the print quality is unacceptable, continue to the adjacent stride.
Pace 6: Check the print settings
Check the impress settings to make certain they are appropriate for your print job.
note:Print settings vary by operating arrangement and software program.
Later on checking the print settings, effort to print again. If the print quality is unacceptable, continue to the next pace.
Step 7: Impress a Print Quality Diagnostic folio
To resolve many print quality issues, print a Print Quality Diagnostic page, and then evaluate the results.
note:To protect the printheads from drying out, e'er turn the printer off using the Power button, and wait until the Ability push light goes out earlier unplugging the printer.
-
Press and hold the Start Re-create Color button
on the printer control console for iii seconds to print a Print Quality Diagnostic page.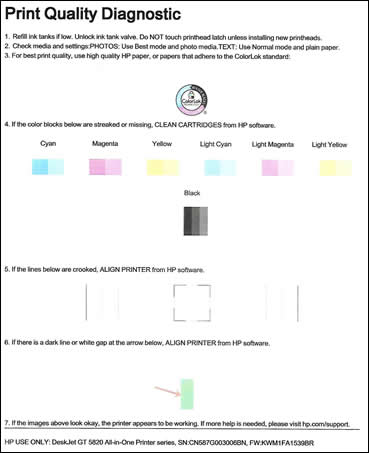
-
Review the Cyan, Magenta, Yellow, and Black boxes, checking for missing colors, fading, and white lines.
-
If the color blocks do not show white lines, and are non faded or missing, the printer is working correctly. Check for image resolution bug, application errors, or other problems that might affect the printout.
-
If any of the color blocks prove white lines, are faded, or are missing completely, continue to the next step.
-
Step 8: Run the printhead cleaning utility using the HP Software
HP provides an automatic printhead cleaning utility that can unclog printhead nozzles.
caution:Make clean the printheads merely when necessary. Unnecessary cleaning shortens the life of the printheads and wastes ink.
To protect the printheads from drying out, always turn the printer off with the Power button.
Make clean the printheads in Windows
Clean the printheads using the HP software, and then evaluate the results.
-
Open or search for the HP folder in your list of installed software programs, click the folder for your printer, and then click the name of your printer.
HP Printer Assistant opens.
-
On the HP Printer Assistant window, click Maintain Your Printer.
-
Click the Device Services tab, and then click Make clean Ink Cartridges
 .
.A Print Quality Diagnostic page prints.
-
Examine the Impress Quality Diagnostic folio.
-
If the print quality is acceptable, click Done. You tin cease troubleshooting.
-
If the print quality is unacceptable, click Second-level Clean when prompted to go on the side by side level of cleaning.
note:
If the printheads are badly chock-full, it might require another cleaning bike. If so, wait 30 minutes before y'all perform both levels of cleaning once again.
-
Clean the printheads in Os Ten
Make clean the printheads using the HP software, and then evaluate the results.
-
Search the Mac for Print, and so click Print & Scan, or Printers & Scanners in the list of results.
-
Click the name of your printer, and and then click Open Impress Queue.
-
Click Printer Setup or Settings, click Utility, and then click Open Printer Utility.
-
Click Clean Printheads.
-
One time the cleaning cycle completes, click Impress.
A Print Quality Diagnostic page prints.
-
Examine the Print Quality Diagnostic folio.
-
If the impress quality is acceptable, click Washed. You tin can terminate troubleshooting.
-
If the print quality is unacceptable, click 2nd-level Clean when prompted to continue the side by side level of cleaning.
note:
If the printheads are badly chock-full, it might require another cleaning cycle. If so, expect 30 minutes before you perform both levels of cleaning once more.
-
If the print quality is unacceptable, continue to the next step.
Step 9: Align the printheads using the HP software
Employ the HP printer software to align the printheads.
Align the printer in Windows
Align the printer in Windows.
-
Open or search for the HP binder in your listing of installed software programs, click the binder for your printer, and then click the name of your printer.
HP Printer Banana opens.
-
On the HP Printer Assistant window, click Maintain Your Printer.
-
Click the Device Services tab, and and so click Marshal Cartridges
 .
.The printer prints an alignment page.
-
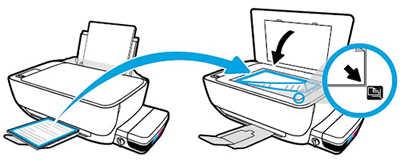
Elevator the scanner lid.
-
Place the alignment page with the print side downward on the scanner glass, then position it according to the engraved guides around the glass.
-
Close the scanner hat.
-
On your computer, click Scan.
The printer aligns the printheads.
-
Recycle or discard the alignment page.
Align the printer in OS X
Align the printer in macOS or OS Ten.
-
Search the Mac for Print and then click Impress & Browse, or Printers & Scanners in the list of results.
-
Click the name of your printer, and and then click Open up Print Queue.
-
Click Printer Setup or Settings, click Utility, and then click Open Printer Utility.
-
Click Align.
The printer prints an alignment folio.
-
Lift the scanner hat.
-
Place the alignment page with the impress side down on the scanner drinking glass, and then position it according to the engraved guides around the glass.
-
On your calculator, click Scan.
The printer aligns the printheads.
-
Recycle or discard the alignment folio.
Endeavour to print again. If the print quality is unacceptable, go along to the next step.
Step 10: Supercede the printheads
If you take followed all the steps in this document and your printer is producing printouts with print quality problems, you must supercede both printheads.
Contact HP to replace both printheads. If you already have new replacement printheads bachelor, go to Replacing Printheads for more data.
Contacting HP for service in Asia Pacific
If you lot completed all the preceding steps and your printer still has an result, yous might need further assistance from HP. Become to Contact HP Back up to review available service options.
Contacting HP for service in all countries/regions, except Asia Pacific
If you completed all the preceding steps and your printer however has an issue, service the product. Check your production warranty to decide if your production is withal under warranty, and so get to Contact HP Support to schedule a repair or replacement.
Repair fees might apply for out-of-warranty products.
Source: https://support.hp.com/my-en/document/c04912978
Belum ada Komentar untuk "Please Consider Deleting Unused Data or Apps and Try Again Gthtdjl"
Posting Komentar